 When it comes to make industrial automation equipment even smarter and more intelligent, the ability to post notifications in case of a failure is indispensable. Most modern PLCs, which are available nowadays, support this feature and can send mails using an SMTP server. This is also the case for the Controllino Maxi & Controllino Mega, the mail server settings can be set easily in a simple C++ function. The function can be called whenever an event occurs.
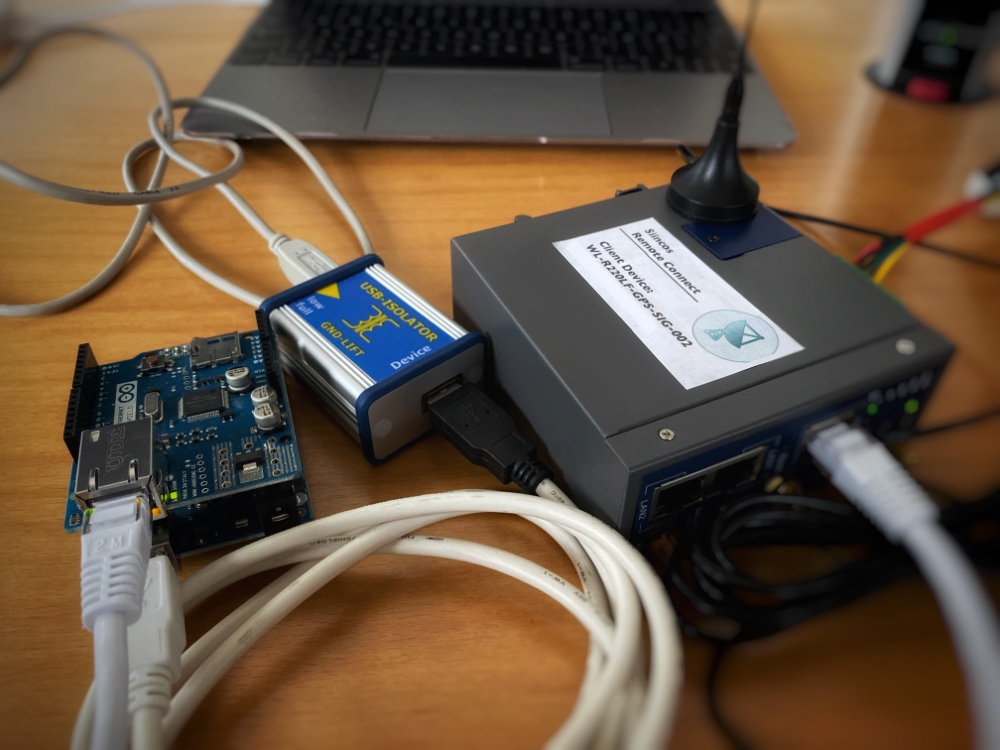
To make mail transfer easier and more controllable it is recommended to use an internal mail gateway instead of connecting the Controllino to the internet directly. In this post I will show you everything you need to know to enable your Arduino/Controllino to send e-mails using a local mail gateway. This post covers:
- Setting up a mail gateway based on Embedded Linux (OpenWrt)
- Programming/Configuring a Controllino/Arduino to send mails via the smtp gateway
The Task
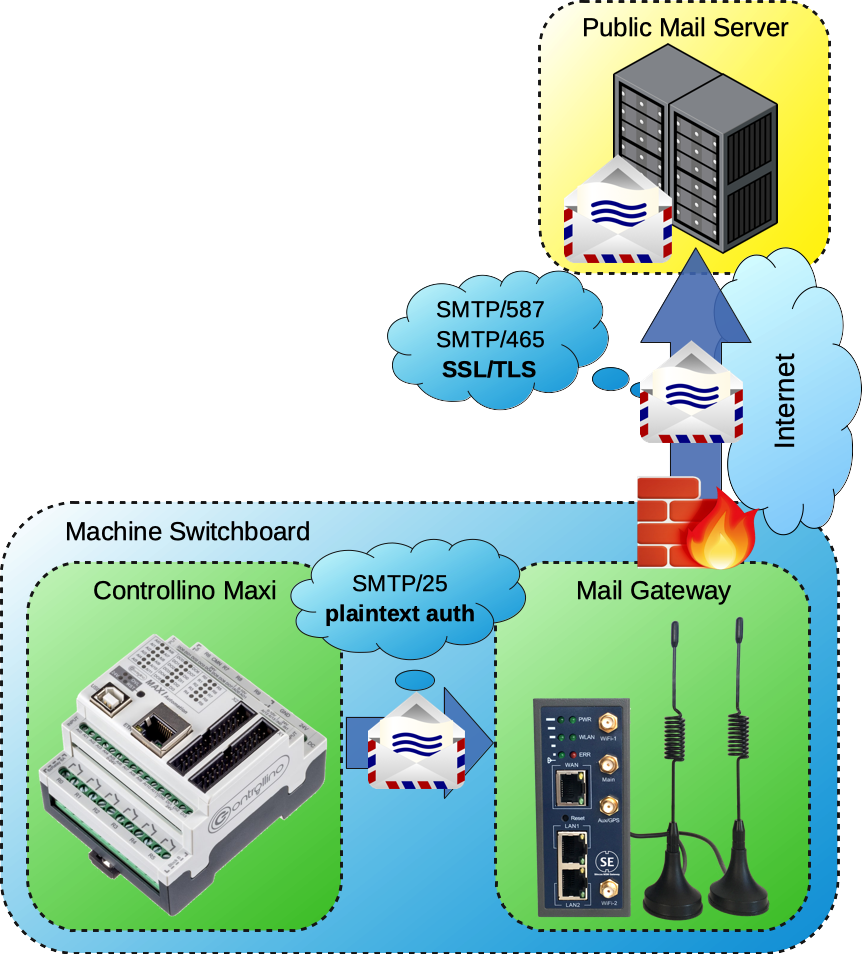
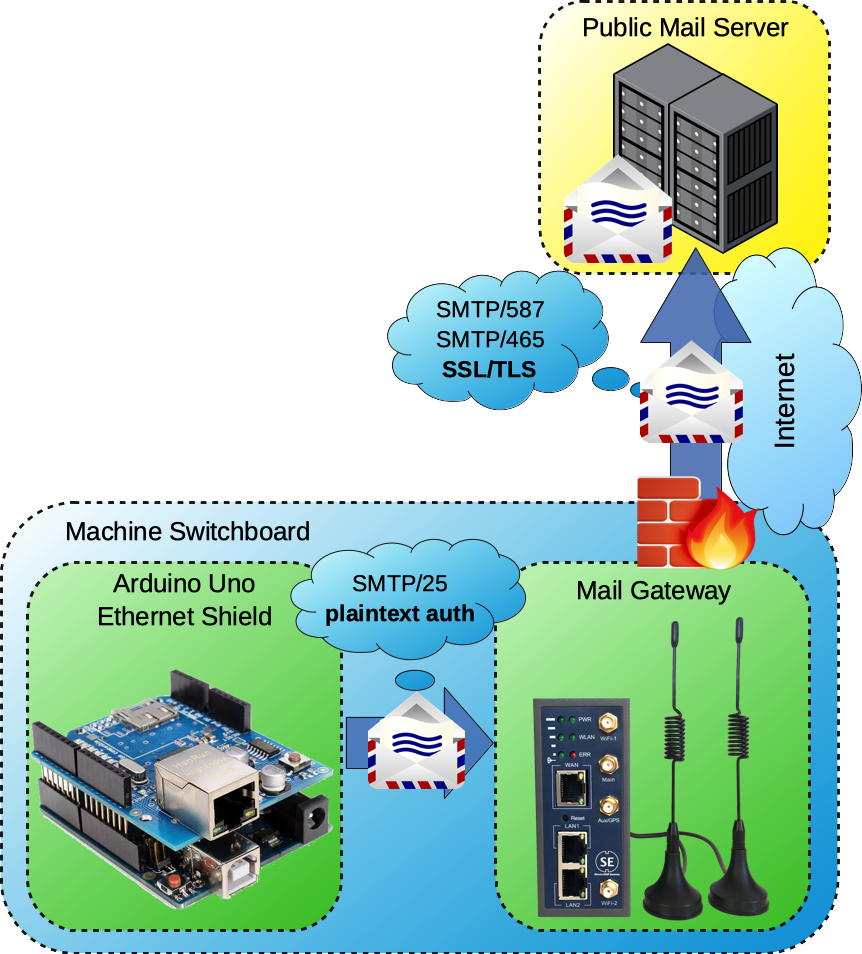
 All modern (and serious) e-mail providers accept SMTP clients on ports 587 or 465 only, which forces the clients to use SSL/TLS cryptography to keep the information private. The microcontrollers used inside the Controllino and Arduino are 8 bit controllers which cannot handle PKI (public key infrastructure) easily - they cannot authenticate against public mail providers which enforce PKI cryptography. Instead, they require a mail server which allows plaintext authentication.
Services which allow plaintext authentication are generally not recommended for being used over public networks (such as the internet), therefore we need to setup an "adapter" which accepts plaintext authentication but meanwhile can connect to public mail servers using SSL/TLS. By the way, to have more control over your devices, the preferred way is to protect them behind an internal gateway. The gateway offers all required services, in this case: an SMTP mail server which is configured as a mail relay.
The mail gateway will be configured to allow plaintext authentication for the Controllino/Arduino on port 25 (SMTP/25) on the internal network and will be able to connect and authenticate (using PKI over SMTP/465 or SMTP/587) with public mail service providers. Our mail gateway can be seen as an "adapter" which can physically be a large server or just a small gateway running embedded linux.
This article covers two parts:
- Setting up a Linux gateway (can be anything which uses Linux as its OS, even OpenWrt will work fine, a Raspberry Pi or a standard Linux computer)
- Setting up the E-Mail functionality for the Controllino/Arduino using the Arduino IDE.
The Architecture
To implement our requirements we need a gateway which acts as the "adapter" between our PLC and the public mail server. Therefore, the gateway must be equipped with a relaying software which listens on its internal network on port SMTP/25 and can connect via SSL/TLS to public mail providers. This functionality is called mail relay or mail transfer agent (MTA).
Configuring the gateway is basically simple, but you should concentrate on what you do, because an SMTP misconfiguration could always lead to an open and unprotected MTA somewhere on the network (or even worse: unprotected MTA listening on an interface which is exposed to the internet).
The technical procedure will work as the following, the Controllino/Arduino uses the gateway as its internal mail server, connecting to port 25, user authentication disabled, encryption disabled. We can disable these security mechanisms in this case, because we assume that the PLC and the gateway are mounted physically on the same switchboard and are interconnected via a LAN cable, both share the same network. Additional peers, except a panel or HMI, do not exist.
The gateway has a working internet connection and can therefore handle outgoing connections, including the connection to a public mail server over the SMTP ports 587 and 465. The gateway supports SSL/TLS connections and can handle the corresponding certificates. When the gateway has a direct connection to the internet, it is important to configure the firewall correctly (which will not be covered by this article).
Gateway Configuration
Let's start the gateway configuration by installing the necessary packages on our hardware. Log in to your gateway/router/edge computer/server through ssh. I used postfix and configured it as a mail relay. For this project I rely on OpenWrt, because it supports lots of hardware, which is available at a fair price. Installing postfix requires almost 4 MB storage space which might not be available on cheap hardware. Installation is straight forward using opkg:opkg update && opkg install postfix
Once postfix installation completes, directly disable the service by typing:/etc/init.d/postfix disable && /etc/init.d/postfix stop
The postfix configuration file is residing in /etc/postfix/main.cf. The config is quite large and confusing, I recommend searching for the parameters inside the configuration file using nano. We start by adding a file which contains our user credentials, these are required to authenticate the gateway against the public e-mail service provider. I got a personal mail provider with my own domain and mailbox, but Gmail will do the job as well. (When using Gmail, you need to enable "allow less secure apps" beforehand, which technically just allows you to connect on port SMTP/587 and use STARTTLS, check Google's help. I recommend setting up a new Gmail account for this purpose.)
Navigate to /etc/postfix and add a new file using nano sasl_passwd
Add the following line to the empty file and save your changes - gmail is just an example to make the syntax clearer, you know what I mean. Edit accordingly with your mail server settings:
[smtp.gmail.com]:587 username@gmail.com:password
Now we begin with the postfix configuration, fire up nano and edit the main.cf file nano /etc/postfix/main.cf
1. Securing postfix to prevent clients from undesired networks and interfaces
By default, postfix listens on all interfaces which are available. My gateway is connected through UMTS/LTE, this means right now postfix would accept clients from this network. This is undesired! I do not want to offer an open mail relay for spammers. We define the following, assuming the gateway's local address is 192.168.1.1, replace this with your settings. Search the configuration file for the following keys and add your settings accordingly:
inet_interfaces = 192.168.1.1
mynetworks = 127.0.0.1/8 192.168.1.0/24
Safe your changes, exit nano and check your changes by typing: postconf | grep mynetworks\ =
This should give you the network(s) for your internal interface only, this is where you will connect your PLC and all the other automation controllers, panels, etc.
2. Configuring the postfix SMTP client
Now we continue by setting up the client session, again open the configuration file and search for the keys to edit or add the values (gmail is just an example to make the syntax clearer). Edit accordingly with your mail server settings:
relayhost = [smtp.gmail.com]:587
smtp_use_tls = yes
smtp_enforce_tls = yes
smtp_tls_enforce_peername = no
smtp_sasl_auth_enable = yes
smtp_sasl_password_maps = texthash:/etc/postfix/sasl_passwd
smtp_sasl_security_options =
That is all for the SMTP client session, authentication with the mail server is going to be carried out using TLS encryption, I disabled peer name verification in the server certificate (smtp_tls_enforce_peername) because the verification requires the server name to be present in the certificate, this is not always the case. Check http://www.postfix.org/TLS_LEGACY_README.html#client_tls for further details.
Additionally, search for the following values, most likely they are not present in the config, add them
disable_vrfy_command = yes
mailbox_size_limit = 0
message_size_limit = 0
disable_vrfy_command = yes prevents someone to check whether a mail address exists, mailbox_size_limit and message_size_limit disables message size and mailbox size verification. This is necessary on embedded devices, because free space is extremely limited. We can risk this in this scenario, because we know that the messages send by our automation equipment will just be a few kilobytes, if sending larger messages, this will cause issues. Restart the service and reboot your system /etc/init.d/postfix enable && /etc/init.d/postfix restart
3. Test the postfix configuration using sendmail
Sendmail is a local mail client and allows you to send mails using the command line. This allows us to check our configuration from the command line without the need of setting up a mail client. Again, connect to your gateway/router/server/edge computer -- using ssh -- where you installed and configured postfix. Type the following:
root@gateway:~# sendmail This email address is being protected from spambots. You need JavaScript enabled to view it.
To: This email address is being protected from spambots. You need JavaScript enabled to view it.
From: This email address is being protected from spambots. You need JavaScript enabled to view it.
Subject: Testmail using sendmail (IoT Gateway)
Hello World
This is a test using sendmail directly from the postfix gateway
# control + d finishes the message and prepares for transmission

# the following shows the current mail queue
root@gateway:~# postqueue -p
Mail queue is empty

# empty queue most likely means that your mail has already been sent by postfix
If the configuration is valid, then you'll receive a mail at your given recipient address.
4. Test the postfix configuration using telnet
Now, use your development computer, which is attached to your gateway and open a terminal window, type:
telnet 192.168.1.1 25
Of course, the ip-address may vary depending on your configuration. Telnet connects to postfix using port 25 and you can talk to the postfix mail server like in the screenshot below:
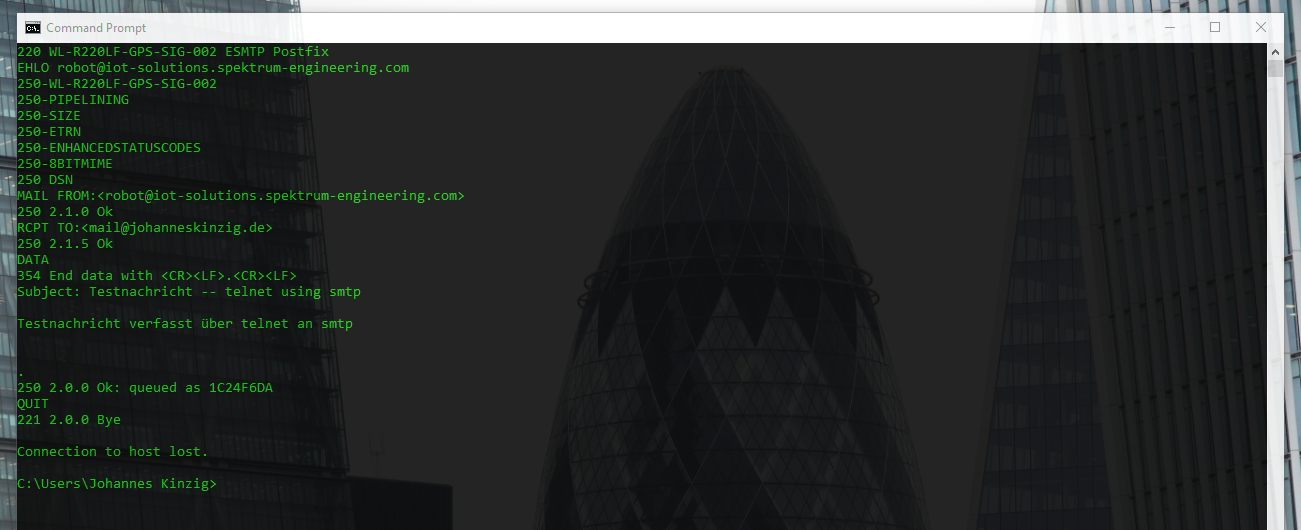 With the configuration described above, the following commands are sufficient for postfix to deliver a mail message:
EHLO This email address is being protected from spambots. You need JavaScript enabled to view it.
MAIL FROM: <This email address is being protected from spambots. You need JavaScript enabled to view it. >
RCPT TO: <This email address is being protected from spambots. You need JavaScript enabled to view it. >
DATA
Subject: a horse
The horse does not eat cucumber salad!
.
QUITIf sendmail worked correctly, then this will work as well and you'll receive your test message at the given recipient address.
Controllino/Arduino Software/Firmware
The same principle as seen above will now be used for our software which runs on the Controllino. The Controllino connects to the mail gateway, fires the same commands as we have used above (in our telnet session) and disconnects afterwards.
We do not need any additional libraries, we use the included <Ethernet> and <SPI> library. An EthernetClient instance is used to connect to the smtp relay (client.connect()) and to fire the commands (client.print() or client.println()).
My project folder contains two source files, one which contains the main loop (smtp_25_mailer.ino) and one which contains the mail client logic (send_mail.ino). The latter contains the mail client functionality in a single function and can be integrated in your own project by just copying the file into your project folder (sketchbook in Arduino nomenclature).
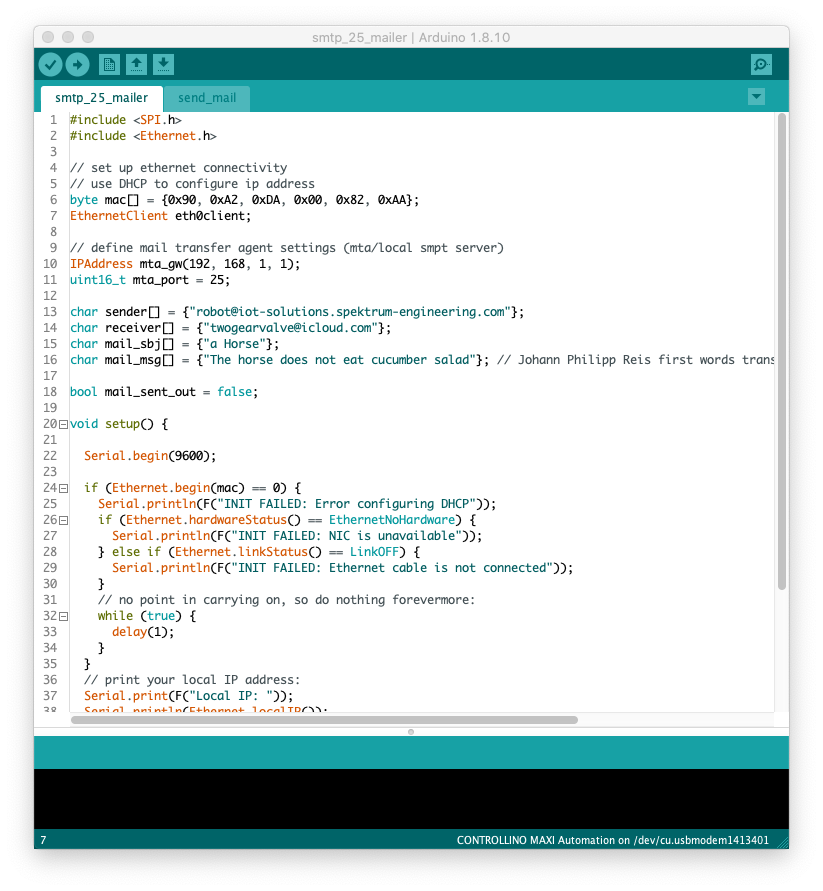
smtp_25_mailer.ino
#include <SPI.h>
#include <Ethernet.h>
// set up ethernet connectivity
// use DHCP to configure ip address
byte mac[] = {0x90, 0xA2, 0xDA, 0x00, 0x82, 0xAA};
EthernetClient eth0client;
// define mail transfer agent settings (mta/local smpt server)
IPAddress mta_gw(192, 168, 1, 1);
uint16_t mta_port = 25;
char sender[] = {"This email address is being protected from spambots. You need JavaScript enabled to view it. "};
char receiver[] = {"This email address is being protected from spambots. You need JavaScript enabled to view it. "};
char mail_sbj[] = {"a Horse"};
char mail_msg[] = {"The horse does not eat cucumber salad"}; // Johann Philipp Reis first words transfered via his invention: the telephone
bool mail_sent_out = false;
void setup() {
Serial.begin(9600);
if (Ethernet.begin(mac) == 0) {
Serial.println(F("INIT FAILED: Error configuring DHCP"));
if (Ethernet.hardwareStatus() == EthernetNoHardware) {
Serial.println(F("INIT FAILED: NIC is unavailable"));
} else if (Ethernet.linkStatus() == LinkOFF) {
Serial.println(F("INIT FAILED: Ethernet cable is not connected"));
}
// no point in carrying on, so do nothing forevermore:
while (true) {
delay(1);
}
}
// print your local IP address:
Serial.print(F("Local IP: "));
Serial.println(Ethernet.localIP());
}
void loop() {
if (!mail_sent_out) {
send_mail(&mta_gw, &mta_port, sender, receiver, mail_sbj, mail_msg, ð0client);
mail_sent_out = true;
}
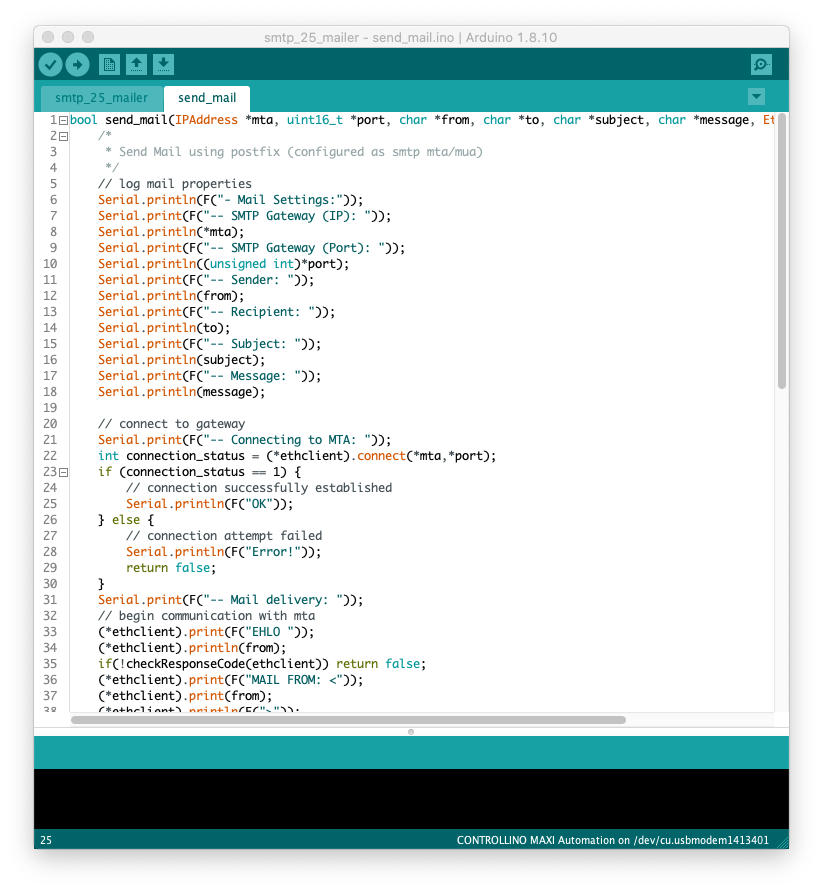
}send_mail.ino
bool send_mail(IPAddress *mta, uint16_t *port, char *from, char *to, char *subject, char *message, EthernetClient *ethclient) {
    /*
     * Send Mail using postfix (configured as smtp mta/mua)
     */
    // log mail properties
    Serial.println(F("- Mail Settings:"));
    Serial.print(F("-- SMTP Gateway (IP): "));
    Serial.println(*mta);
    Serial.print(F("-- SMTP Gateway (Port): "));
    Serial.println((unsigned int)*port);
    Serial.print(F("-- Sender: "));
    Serial.println(from);
    Serial.print(F("-- Recipient: "));
    Serial.println(to);
    Serial.print(F("-- Subject: "));
    Serial.println(subject);
    Serial.print(F("-- Message: "));
    Serial.println(message);

    // connect to gateway
    Serial.print(F("-- Connecting to MTA: "));
    int connection_status = (*ethclient).connect(*mta,*port);
    if (connection_status == 1) {
        // connection successfully established
        Serial.println(F("OK"));
    } else {
        // connection attempt failed
        Serial.println(F("Error!"));
        return false;
    }
    Serial.print(F("-- Mail delivery: "));
    // begin communication with mta
    (*ethclient).print(F("EHLO "));
    (*ethclient).println(from);
    if(!checkResponseCode(ethclient)) return false;
    (*ethclient).print(F("MAIL FROM: <"));
    (*ethclient).print(from);
    (*ethclient).println(F(">"));
    if(!checkResponseCode(ethclient)) return false;
    (*ethclient).print(F("RCPT TO: <"));
    (*ethclient).print(to);
    (*ethclient).println(F(">"));
    if(!checkResponseCode(ethclient)) return false;
    (*ethclient).println(F("DATA"));
    if(!checkResponseCode(ethclient)) return false;
    (*ethclient).print(F("Subject: "));
    (*ethclient).println(subject);
    (*ethclient).print(message);
    (*ethclient).print(F("\r\n.\r\n"));
    if(!checkResponseCode(ethclient)) return false;
    (*ethclient).println(F("QUIT"));
    // disconnect client from gateway
    (*ethclient).stop();
    // Mail sent
    Serial.println(F("SUCCESS"));
}

bool checkResponseCode(EthernetClient *ethclient) {
    /*
     *  Check if connection to mta is still active
     */
    char responseCode;
    if (!(*ethclient).available()) {
        // terminate connection and return error
        (*ethclient).stop();
        Serial.println(F("FAILED"));
        return false;
    }
    else if ((*ethclient).available()) {
        // check response code from mta
        responseCode = (*ethclient).peek(); // just read first byte
        if (responseCode >= '4') {
            (*ethclient).println(F("QUIT)"));
            Serial.println(F("FAILED"));
            return false;
        }
        else {
            return true;
        }
    }
}